
WP OsTicket Connector
WordPress plugin


Beschreibung
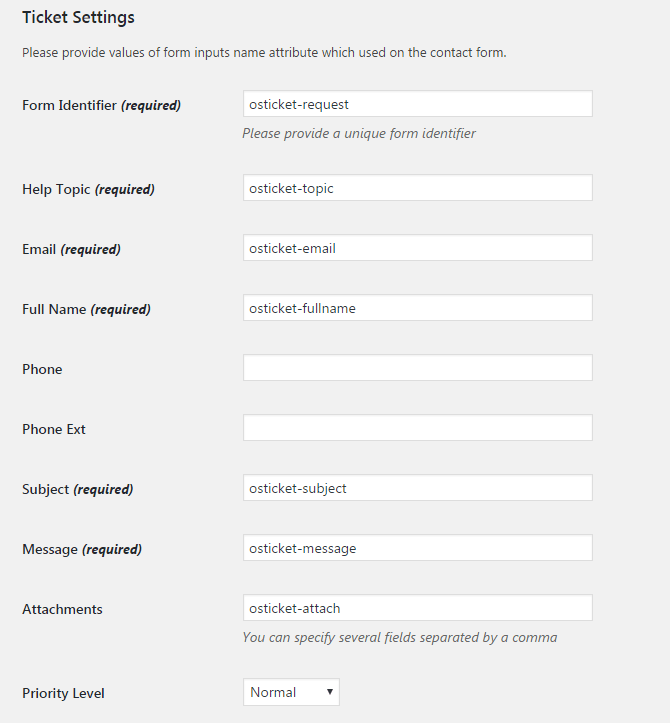
Dieses WordPress-Plugin unterstützt die Erstellung neuer Tickets im osTicket-System mithilfe der osTicket-API. Nur Kontaktformulare, die E-Mails senden, werden unterstützt, da unser osTicket-Plugin die Funktion „wp_mail()“ verwendet, um die Daten aus den Formularen zu erhalten. Das Kontaktformular auf Ihrer Website sollte mindestens die Felder „Hilfethema“, „E-Mail“, „Vollständiger Name“, „Betreff“ und „Nachricht“ enthalten. Die osTicket-API wird als SimpleXML oder JSON über HTTP verwendet. Es wird nur das Erstellen von Tickets unterstützt.
Bereitstellung
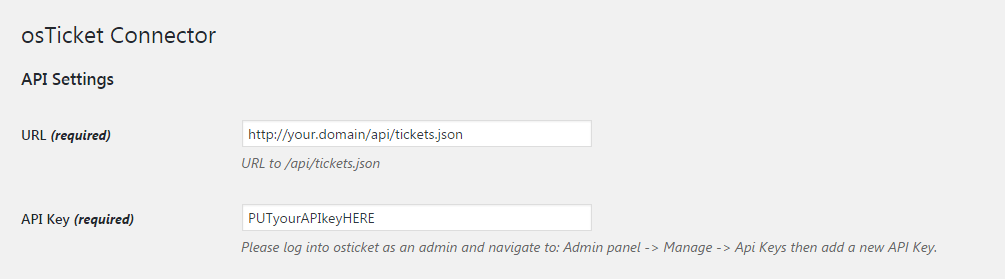
1. Konfigurieren Sie das osTicket-Supportsystem, um den Zugriff per API für Ihr WordPress zu ermöglichen (sehen Sie den Abschnitt „Authentifizierung“).
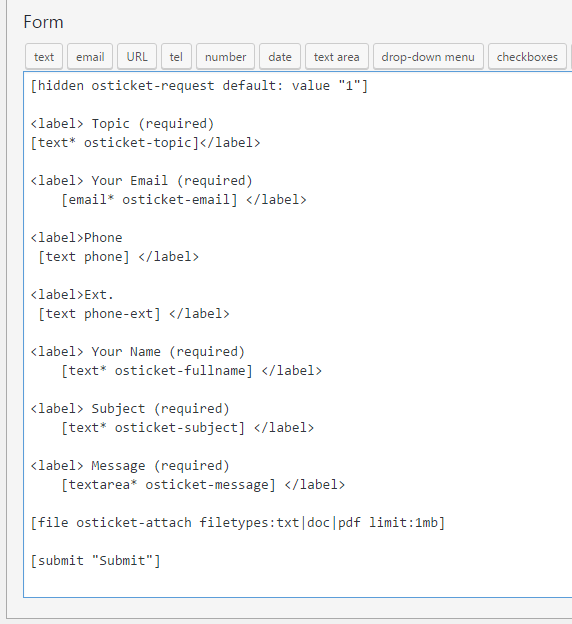
2. Setzen Sie das Kontaktformular ein und geben Sie den Attributwert des Tag-Namens genau so ein, wie er im Einstellungsformular des Plugins angegeben ist. Dadurch werden die Daten korrekt der osTicket-API-Datenvorlage zugeordnet.
3. Fügen Sie eine versteckte Eingabe mit einem im „Formularbezeichner“ angegebenen Namen bei Verwendung des Kontaktformulars hinzu.
Installation
WordPress-Installation
1. Gehen Sie zu Plugins > Neu hinzufügen > suchen Sie nach „scand-osticket-connector“.
2. Klicken Sie auf den Button „Jetzt installieren“ für das Plugin „osTicket Connector“.
3. Klicken Sie auf den Button „Aktivieren“.
Manuelle Installation
Laden Sie das Verzeichnis „scand-osticket-connector“ in das Verzeichnis „/wp-content/plugins/“ hoch.
Aktivieren Sie das Plugin über das Menü „Plugins“ in WordPress.

Screenshots
Verwandte Produkte

WP MultiMailer
WordPress-Plugin, das das Senden von Daten von einem Kontaktformular an mehrere E-Mail-Adressen ermöglicht.
Einfaches Google Analytics-Toolkit
WP-Plugin, das die Integration mit Google Analytics ermöglicht, indem entweder die klassische Google Analytics-Bibliothek oder das neu veröffentlichte Global Site Tag ausgewählt wird. Erfahren Sie mehr